OPI Pastels - I Am What I Amethyst Review
Updated 2024.07.10. This post contains affiliate links. If you make a purchase, Lots of Lacquer and its partners may earn a commission or other compensation, at no extra cost to you. As an Amazon Associate I earn from qualifying purchases.
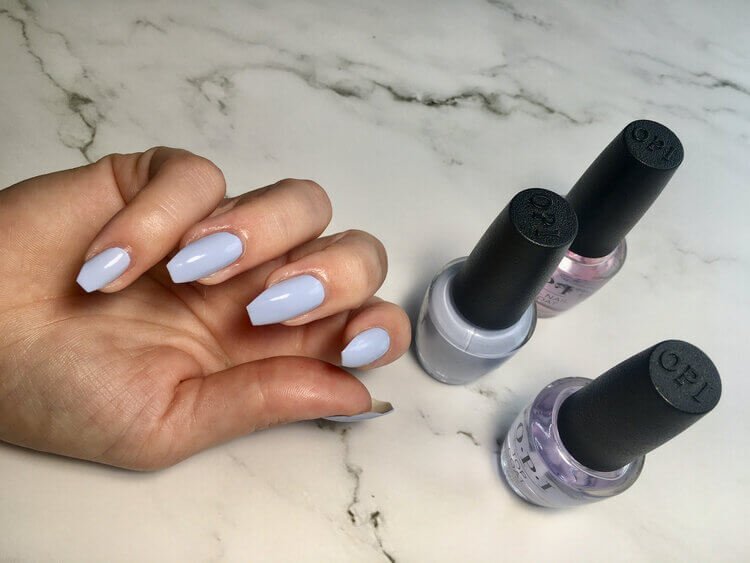
OPI’s I Am What I Amethyst is listed as both a light pale lilac and a soft sweet lavender and it appears as a warm periwinkle color on the nail.
It’s a beautiful combination of lightness and springtime in a bottle.
In this post, the formula Pastel Nail Lacquer, which is the original OPI formula, is what is being shown.
You can always count on an OPI Polish to have a nice formula, and though some polish types take a little bit of a learning curve to apply, as discussed below, all OPI polishes are pretty user friendly.
The formulas are thin enough that you can get a smooth coat with little practice. They tend to have high color payoff, glide easily on the nail, and can dry quite quickly.
This year, OPI won the 2021 Glamour Beauty Awards, which is an award system based on reader favorites, and for good reason which you’ll see in the swatches below.
The supplies used for this swatch are:
Part of the beauty of OPI’s ease is they directly sell through Amazon, so you can buy all these products above through one purchase on Amazon.
How to get the best results applying this OPI Pastel color formula
I Am What I Amethyst is a creme pastel polish, and creme polishes, meaning they are a polish with no glitter or shimmer, tend to show every mis-matched line, especially near the cuticle line.
For example, you do your first color coat, but then don’t exactly match your lines to the cuticle edges on the second coat, creme polishes will usually show these mis-aligned edges pretty clearly.
Additionally, if you pick up the brush too much, or go over multiple lines in a single coat, you may get streaks.
To avoid a streaky finish, first, just be patient.
If it is your first time doing a manicure with a creme polish, it may take a few attempts to get your technique right. Once you have your technique down, any creme polish you work with after that will be a breeze.
To start your manicure, simply make sure you have your brush totally coated in plenty of polish, and begin with placing a bead of polish at the top middle of your nail, then spread your polish to the rest of your nail downward in one swipe, then one swipe on the left, and another on the right, in each coat. Repeat this process on every nail.
If you see a gap in color on your first coat, don’t overwork it. This formula dries quickly and you may get draglines. Simply go over it again in your second or third coat. Plus, nail polish is a liquid, and will sometimes equalize itself out as it dries down to the nail.
When finishing your manicure, right before you apply your top coat, get an old eyeliner brush or flat-edged paint brush and some nail polish remover to clean up any jagged edges.
You will then get the perfect edges near your cuticle that you desire.
Finish with your top coat.
Relax as your perfect manicure dries, and as a general rule, try to keep your nails away from any high heat sources (i.e. an oven) for at least two hours while the polish fully cures.
If you are new to OPI, while these polishes are versatile and will work with most other base and top coats, they tend to play best with a matching OPI Base Coat and Top Coat, so be sure to pick these up too.
Other Articles You May Enjoy:
Amazon and the Amazon logo are trademarks of Amazon.com, Inc. or its affiliates. As a Beyond Polish Brand Ambassador, this site earns from qualifying purchases. Use coupon code LOTSOFLACQUER for 10% OFF at Beyond Polish.


